My father bought me an advanced Cricut Maker 3 Machine so that I can enhance my crafting skills. I was excited and terrified at the same time, as I didn’t know how to use it. However, later on, I learned the whole process through my practice and decided to create this guide for Cricut beginners who are finding it difficult to get the right guidance.
The Cricut Maker 3 is not limited to working with a few materials; it is compatible with over 300 materials, ranging from delicate paper to thicker materials like balsa wood and leather.
In this guide, I’ll provide you with the complete process with the help of a mug project so that you can learn how to use Cricut Maker 3 clearly, with step-by-step instructions. This guide includes everything you need to learn before you learn to design your first-ever project.
Supplies Required for the Project
Below, I have listed all the supplies needed for making your first-ever mug project. These are:
- Cricut Maker 3
- A blank mug of any color
- Cricut Smart Vinyl of any color
- Transfer Tape
- Weeding tool
- Cricut Standard Grip Transfer Tape
- A computer, tablet, or smartphone
- Internet connection
- Cricut Mug Press (optional, for heat transfer designs)
How to Use Cricut Maker 3:Your First Ever Project Guide

To create a mug using a Cricut Maker 3 and Mug Press, you’ll need to design your image in Cricut Design Space, cut it with the Maker 3 using the Infusible Ink Transfer Sheets, prepare and apply the design to a Cricut mug blank, and then use the Mug Press to transfer the design.
Let’s learn it step-by-step:
Step 1: Set Up Your Cricut Maker 3
- Visit Cricut.com/setup and download Cricut Design Space.
- After that, click on the Download button and follow the commands on your device’s screen.
- Connect your machine using either a USB cable or the Bluetooth method.
- After downloading and installing the ‘Cricut Design Space app‘, open it.
- Locate the Machine Setup option within the app and click on it.
- Select your ‘Cricut Machine Model‘ from the list and proceed with the design.
Step 2: Open Design Space & Create Your Mug Design
- Open the Cricut Design Space on your computer or mobile device.
- Then, click on “New Project” to start with a blank canvas and start designing.
- Now, use the Text tool to add text to your design. If you are using your own design, please upload it as an SVG or PNG file.
- Adjust your design by giving it an accurate size and placement on the mug template.
- Select all design elements and click Attach to ensure they cut and print as a single unit.
Step 3: Select Materials in Cricut Design Space
- Once you’re satisfied with your design, click the green” Make It” button
- In the Mirror settings, toggle to mirror your design and click Continue.
- Next, click Browse All Materials and locate Material Settings.
You can either scroll through the list to find a material you want to edit or select Add New Material at the bottom of the list to create a custom setting. - Search for Infusible Ink Transfer Sheets and select it.
- Set your pressure setting to More for a clean cut through the transfer sheet.
Step 4: Load Smart Vinyl into Cricut Maker 3
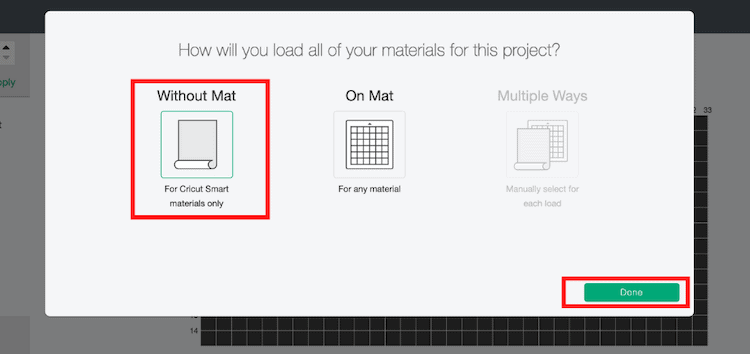
- When prompted, select the ‘Without Mat’ option and click ‘Done’.
- Ensure that you trim the Smart Vinyl straight across if you’ve cut it before and plan to load it without a mat.
- Place the Smart Vinyl color side up into the machine, aligning the edge with the left material guide.
- Gently push the vinyl under the machine’s material guides and up against the rollers.
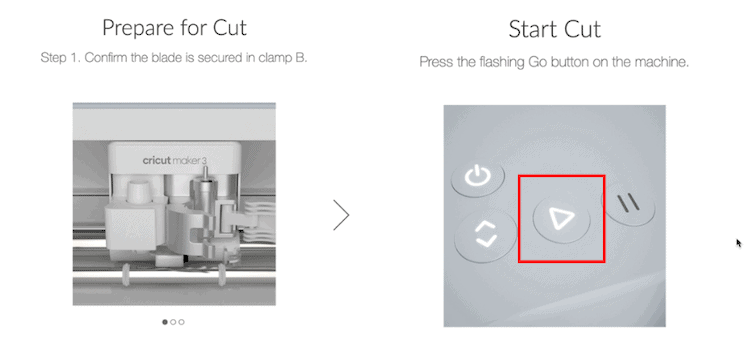
- Make sure to install the Fine-point blade in Clamp B.
- Press the “Go” or “Load” button on the machine.
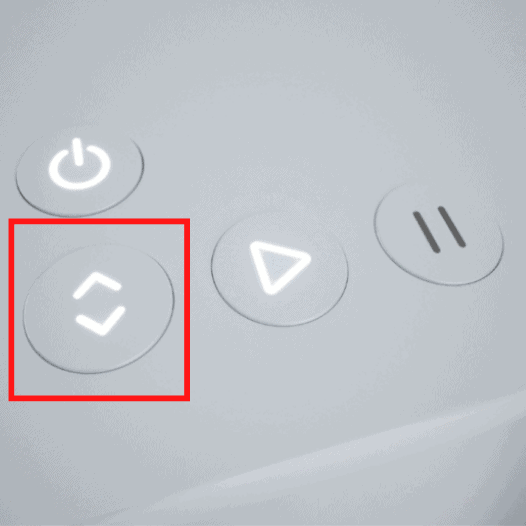
- Once you’re done with cutting your design, press the two arrowhead button to unload the Smart Vinyl.
Step 5: Weed Your Design
- Find a clean, well-lit area to work in.
- Gently bend and roll the transfer sheet to lift the edges of the design from the carrier sheet.
- Carefully peel away the unwanted pieces of the Infusible Ink sheet.
- You need to pay close attention to the intricate details of the design. Use your weeding tool or fingers to eliminate any small pieces or negative areas.
Step 6: Use Transfer Tape to Move the Design
- Simply, cut a piece of transfer tape bigger than your finalised design.
- Peel away the backing from the transfer tape and place it over the front of your weeded vinyl design.
- Use a scraper tool to firmly press and smooth the transfer tape onto the vinyl.
- Flip the design over and burnish the back side of the vinyl as well to ensure good adhesion.
Step 7: Apply the Design to the Mug
- Clean your mug to remove any dust or oils from it. Ensure it’s dry before proceeding.
- Now, wrap your design around the mug.
- Use heat-resistant tape to secure the paper, especially around the edges and under the handle.
Step 8: Use Cricut Mug Press for Heat Transfer Vinyl
- Place the wrapped mug into a mug press, ensuring it’s properly aligned.
- Once you hear the beep sound, let the machine do its work.
- After some time, the machine will beep again, once it’s done heating, and all five lights will be lit up.

- Take out your mug from the machine and wait 5-7 minutes until it cools.
Now, here comes the most interesting part: remove the wrap and see your design as it takes shape.